returnEasier installs from the Shopify App Store like any other app. Right afterwards, a five-step wizard gets your store ready in under three minutes: language and country, product type, returns policy, activating the withdrawal button and choosing a plan. Each step saves what you fill in, so you can close it and pick up where you left off. Here it is, field by field.
Installing the app
Search for returnEasier in the Shopify App Store and click Install. Shopify asks you to accept the permissions and, when you return to the admin, returnEasier takes you straight to the setup wizard. Until you finish it, the app always redirects you here: you cannot use the dashboard halfway through.
Step 1: Language and country
Choose your store's main country and the customer portal language (the one your shoppers will see when they withdraw or return).
- Main country: Spain, Portugal, United Kingdom, France, Germany, Italy or "Other EU country". The default is Spain. Changing it automatically preselects that country's language.
- Customer portal language: Español, English (EU), Português, Català, Italiano, Français or Deutsch. The default is Español. On monolingual plans this is the language of the whole portal, the emails and the PDF; on Scale the portal detects each shopper's language.
Step 2: Product type
State what you mainly sell and under which contractual regime.
- Category: Fashion and clothing, Cosmetics, Accessories, Footwear, Sports, Home, Gift or Other. The default is Fashion and clothing. It is your store profile: it neither blocks nor excludes products.
- Type of contract: Physical goods (the 14-day window starts on delivery), Services or digital content (it starts on purchase, and there is nothing to return) or Both. The default is Physical goods. This determines the dies a quo —when the window starts— and affects the wording of the confirmation email and the PDF.
If you want to exclude specific products from returns, that is done by tag in Commerce settings (Pro), and it only affects the commercial flow: legal withdrawal is never blocked.
Step 3: Returns policy
The legal withdrawal period is 14 days and returnEasier always applies it: it is neither asked for nor changeable. Here you only decide one thing.
- Who pays for return shipping? The store (recommended for conversion) or the customer. The default is the store. It appears in the confirmation email and in the PDF, as the pre-contractual information requires.
If you want to offer a commercial window more generous than the 14 legal days (for exchanges or store credit), it is configured separately in Commerce settings (Pro).
Step 4: Activate the button on your store
The withdrawal button is mandatory (EU Directive 2023/2673). It is activated from your theme editor as an App Embed, without touching any code.
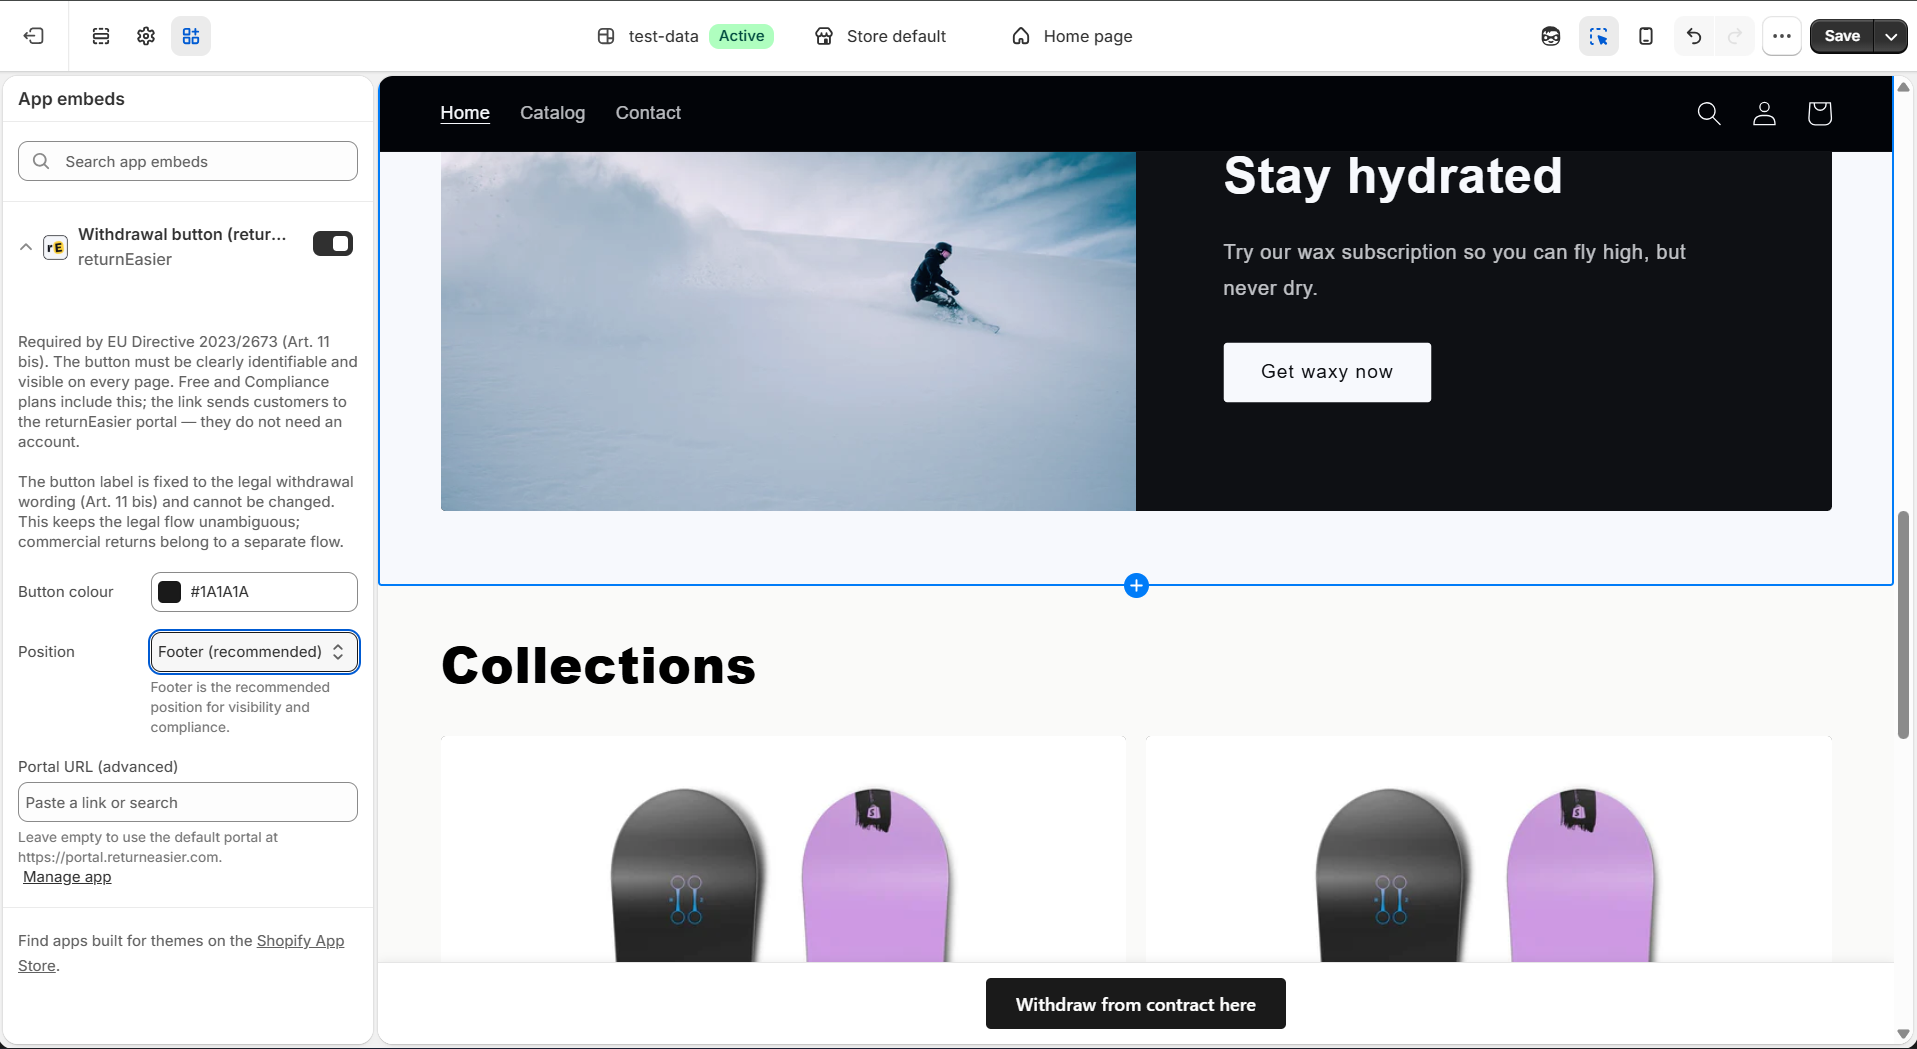
- Button text: it is fixed, "Withdraw from contract here" (Art. 11 bis), and cannot be changed.
- Position: Footer (recommended), Header or Floating button. The default is Footer.
- Button colour: in hexadecimal format, e.g.
#1a1a1a. The default is#000000(black). - "Open the theme editor": opens the Shopify editor in the App Embeds section, where you activate the button.
- "I have already activated the button on my store": this box is required to finish. If you do not tick it, the wizard will not let you move on and reminds you of it. (Your position and colour preferences are saved anyway, you do not lose them.)
For full detail on the button and the discreet App Block, see the article on how to activate the withdrawal button.
Step 5: Choose your plan
Your configuration is now ready. This step is informational: you will see the cards for the four plans with their price in USD (Shopify bills you in your local-currency equivalent; your customers don't pay for returnEasier).
- Free — 0 USD: withdrawal button + 3 trial returns + basic audit log.
- Compliance — 14.99 USD/month: 25 returns/month + legal templates + immutable audit log + PDF with integrity hash and timestamp.
- Pro — 24.99 USD/month: 100 returns/month + exchanges and store credit + rules + photos + your own branding.
- Scale — 79.99 USD/month: 400 returns/month + labels with your Sendcloud account + multi-language + analytics.
Click "Start for free" to go to the dashboard, or "See paid plans" to choose one. The Free plan already meets the law: you do not need to pay to have the button active. You can change plans at any time from Plans.
What happens if I close it halfway
You lose nothing. Each step saves its data when you click Continue, and the next time you open returnEasier it takes you to the first step you still have to complete. The wizard is only considered finished once you have filled in country, product and policy and confirmed that you activated the button; at that point the configuration is sealed and you enter the dashboard.